How to Use Oster Electric Wine Opener for Effortless Wine Opening
Opening a bottle of wine becomes super fun with the Oster Electric Wine Opener. Forget about the difficulties of traditional corkscrews and embrace the ease of an electric opener. This easy-to-follow guide will show you each step to properly use your Oster Electric Wine Opener, making sure every bottle opens smoothly. From charging the device to fixing common problems, this guide has everything to make your wine-opening adventure simple and enjoyable. Cheers to hassle-free wine moments!
How to Use an Oster Electric Wine Opener
Opening your favorite bottle of wine has never been easier with the Oster Electric Wine Opener. Follow these simple steps to ensure a smooth process every time.
Step 1: Removing Foil
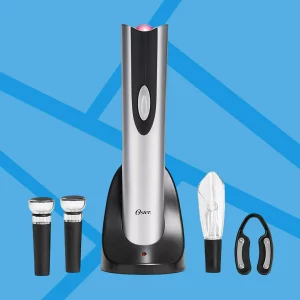
To start, use the foil cutter or a knife to neatly remove the foil from the top of the bottle. Make sure the Oster electric wine opener is centered and level on the bottle.
Step 2: Opening the Bottle
Hold the wine bottle securely and press the down button on the Oster electric wine opener. Watch as the corkscrew effortlessly penetrates the cork. Keep the button pressed until the corkscrew completes its task. The Oster opener will automatically extract the cork, and once removed, it stops, allowing you to lift the bottle away.
Step 3: Opening a Bottle with Ease
For a spill-free experience, securely hold the bottle. In case the cork gets stuck, utilize the reverse button on the Oster opener. Ensure the opener is fully charged before use, as a full charge can handle up to 30 bottles. Remember to clean the opener after each use to maintain optimal functionality and extend its lifespan.
Step 4: Cork Removal Process
Place the bottle on a flat surface and secure it. Confirm that the opener is centered and properly positioned on the bottle. Press the down button to lower the corkscrew into the cork, and keep the opener steady as the corkscrew turns. The opener stops automatically once the cork is successfully removed. To release the cork, press the “up” button.
Note: Always ensure the opener is fully charged and follow the manufacturer’s instructions for proper use and maintenance. Enjoy effortless bottle opening with the Oster Electric Wine Opener!
Checking Your Oster Wine Opener’s Battery Level
Learn how to check the charging status of your Oster Wine Opener with simple steps. Whether you’re using the charging base or cord, ensuring your opener is always ready for action is easy.
Using the Charging Base
- Connect the charging base to an electrical outlet.
- Set the wine opener on the base; observe the LED light.
- A green light signals that your opener is fully charged and ready to go.
Using the Charging Cord
- Plug the charging cord into an electrical outlet; watch for the opener’s LED activation.
- The light turns off once the opener is completely charged.
Remember
- For optimal performance, charge your wine opener after each use.
- Keep an eye on the LED lights to ensure your device is always in a state of readiness.
By following these simple steps, you’ll not only keep your Oster Wine Opener charged but also extend its overall lifespan for future enjoyment.
Does Oster Wine Opener Have Batteries?

- Yes, the Oster electric wine opener has a rechargeable battery.
- Charge using a base or cord; a full charge may take several hours.
- Refer to the user manual for battery care instructions.
Easy Steps for Using Your Oster Automatic Wine Opener
Learn how to effortlessly open your favorite bottles with the Oster Automatic Wine Opener. Follow these simple instructions for a smooth experience.
Charging Your Wine Opener
To make sure your wine opener works optimally, always charge it fully before use. Here’s how:
- Place the wine opener on the charging base.
- Plug it in and let it charge.
Removing Foil and Opening the Bottle
Opening a bottle has never been easier. Follow these steps:
- Use the foil cutter provided to effortlessly remove the bottle’s foil.
- Position the wine opener over the cork.
- Gently press down to remove the cork.
- Press up to release the cork from the opener.
Maintenance for Longevity
- To ensure lasting performance, remember to charge your wine opener after each use.
Enjoy your hassle-free wine opening experience with the Oster Automatic Wine Opener!
Tips for Using Oster Automatic Wine Opener
- Confirm a full charge before usage.
- Clean the opener after each use.
- Store it out of reach of children and animals.
- Designed for still wines only; avoid using it for sparkling wine.
How to Replace Batteries in Your Electric Wine Opener
Learn how to easily change the batteries in your electric wine opener. Follow these simple steps to ensure your device functions smoothly and efficiently.
Find the Battery Compartment
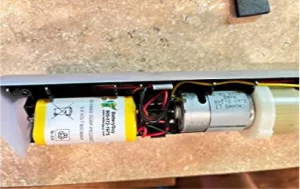
Locate the battery compartment on the bottom or back of your electric wine opener.
Changing Batteries
Using the provided method, open the compartment carefully. Remove the old batteries and insert the new ones, ensuring the proper polarity.
Securely Close the Case
Close the battery compartment securely to prevent any damage or issues. This step is crucial for maintaining the longevity of your electric wine opener.
Test the Opener
Check the functionality of your electric wine opener with the new batteries. Ensure that it operates smoothly to guarantee a hassle-free experience.
Dispose of Old Batteries Responsibly
Follow your local recycling guidelines to dispose of the old batteries in an environmentally friendly way. This simple step contributes to a sustainable and eco-friendly lifestyle.
By following these easy instructions, you can keep your electric wine opener in optimal condition and enjoy the convenience it brings to your wine-opening experience.
Oster Wine Opener Not Charging: Troubleshooting
Troubleshooting Charging Issues
- Check the power source and ensure the base is plugged in.
- Inspect charging contacts for cleanliness.
- Properly place the opener on the charging base.
- Consider battery condition and replace if needed.
- Allow sufficient charging time; several hours may be required.
- Check indicator lights for charging status.
- Reset the opener and charging base if needed.
- Inspect for worn parts or visible damage.
- Contact customer support if issues persist.
Our Final Thoughts
Enjoying your favorite bottle of wine is a breeze with the Oster electric wine opener. Follow these simple steps and helpful tips to easily and safely open a bottle of wine. Make sure to hold the bottle securely and remember to clean your Oster electric wine opener after each use for the best experience. Opening a bottle of wine has never been so easy and fun with the Oster electric wine opener!
FAQs
Can I use an Oster electric wine opener on all types of wine bottles?
How long does it take to charge an Oster electric wine opener?
Can I replace the corkscrew on my Oster electric wine opener?


